How to Clean a Handgun?

A firearm you rely on for everyday carry (EDC) or home defense is a precision tool requiring consistent care to function flawlessly. Daily exposure to sweat, lint, and environmental debris can compromise its reliability, making regular gun maintenance a critical responsibility, not just a good habit. To keep your handgun in peak condition, we recommend a simple but effective cadence: a quick clean after each range session, a detailed cleaning every six months, and an annual professional inspection. This guide will walk you through that essential process.
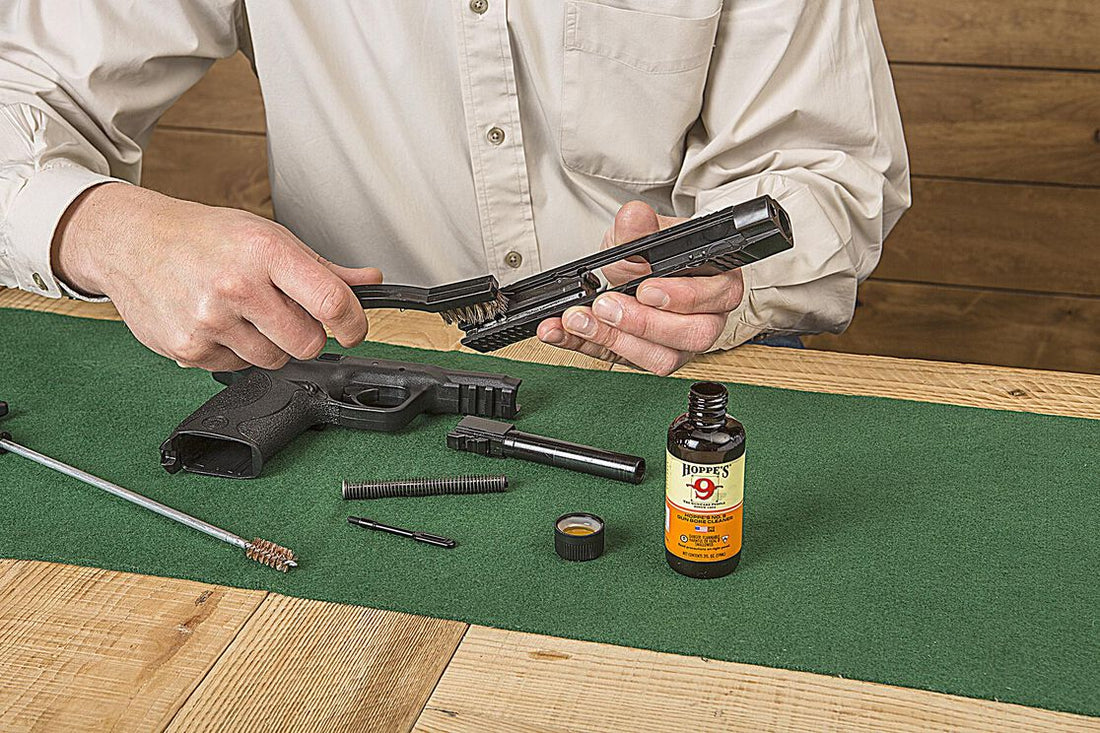
Tools for Firearm Maintenance
Before you begin, gathering the right tools will make the job faster, easier, and more effective. You don't need a professional workshop, just a few key items.
- Firearm Rag: A simple, lint-free cloth is perfect for wiping away loose carbon residue, excess oil, and grime from the exterior of your handgun.
- Pull-Through Cleaning Cord (Bore Snake): For a quick barrel clean after a range trip, nothing is faster. A single pull scrubs the inside of the barrel and removes the bulk of the fouling.
- Nylon Brush (or Toothbrush): A stiff-bristled nylon brush is essential for scrubbing stubborn carbon buildup from the slide, frame, and other small components without scratching the finish.
- Lubricant Pre-Treated Cloth: After cleaning, wiping the exterior surfaces of your slide and frame with a cloth treated with a cleaner, lubricant, and protectant (CLP) will preserve the firearm's finish and provide a barrier against moisture and rust.
- Lubricating Oil: A quality gun oil is used to lubricate key friction points. Metal-on-metal contact requires a thin layer of lubrication to ensure smooth operation and prevent premature wear.
- Bore Cleaner/Solvent: For a deep clean, a dedicated bore solvent is needed to break down lead, copper, and carbon fouling inside your barrel.
- Comprehensive Cleaning Kit: The easiest way to get everything you need is with an all-in-one firearm cleaning kit. A good kit will include cleaning rods, jags, brushes, patches, and solvents for various calibers, ensuring you have the right tool for the job every time.
The Detailed Cleaning Process
This step-by-step process will guide you through a complete field strip and cleaning. Always perform maintenance in a well-ventilated area, free from distractions.
Step 1: Ensure the Firearm is Clear and Safe
This is the most important step. There is no exception.
- Point the firearm in a safe direction.
- Remove the magazine.
- Pull the slide to the rear to eject any round in the chamber and lock the slide open.
- Visually and physically inspect the chamber and magazine well to confirm they are empty. Once you are 100% certain the firearm is unloaded, you can proceed.
Step 2: Disassemble the Firearm
Disassemble your handgun to its basic components: the slide, barrel, recoil spring/guide rod, and frame. This process, known as "field stripping," varies between models. Always refer to your owner's manual for the correct procedure for your specific firearm.
Step 3: Clean the Components
With the handgun disassembled, you can now clean each part individually.
- The Slide: Using your nylon brush and a small amount of solvent, scrub the inside of the slide, paying close attention to the slide rails (the grooves the frame fits into), the breech face (where the cartridge sits), and the area around the extractor. Wipe everything down with your rag until it comes away clean.
- The Barrel: Apply bore cleaner to a patch or the appropriate caliber brush and run it through the barrel from the chamber end toward the muzzle. Let the solvent sit for a few minutes to break down fouling. Then, run clean patches through until they come out white. Finally, inspect the feed ramp—the small, polished ramp at the back of the barrel where cartridges slide into the chamber. Ensure it is clean and smooth, as buildup here is a common cause of feeding malfunctions.
- The Recoil Spring and Frame: The recoil spring and guide rod can simply be wiped down to remove any carbon. For the frame, use your brush to lightly scrub the slide rails and remove any debris. Avoid using excessive solvent inside the frame to prevent it from seeping into the trigger assembly.
Step 4: Lubricate Friction Points
- Place a small drop of oil on the outside of the barrel where it contacts the slide.
- Apply a drop to the barrel hood and locking lugs.
- Place a few small drops along the slide rails inside the slide. Remember, a little goes a long way. Over-lubricating can attract dirt and cause malfunctions.
Reassembly and Function Check
Once everything is clean and lubricated, it's time to put your handgun back together.
Step 1: Reassemble the Firearm
Follow your owner's manual instructions to reassemble the firearm in the reverse order of disassembly.
Step 2: Perform a Function Check
With the firearm reassembled (and still confirmed unloaded), perform a function check to ensure everything is working correctly.
- Rack the slide several times to feel for smooth operation.
- With the firearm pointed in a safe direction, pull the trigger. You should hear a "click."
- Hold the trigger to the rear, rack the slide again, and then slowly release the trigger. You should feel and hear a distinct "click" as the trigger resets.
- Test any manual safeties to ensure they engage and disengage properly.
Concealed Carry Considerations
For a concealed carry firearm, this maintenance routine is even more critical. Your gun's reliability is directly tied to your comfort and your ability to carry it confidently. A well-maintained firearm operates properly, and a quality holster not only aids in concealment but also helps protect your firearm from lint and debris. When choosing a holster, try several options at a local shop to find one that is comfortable and provides a secure fit for your specific handgun.
Your Firearm is a Lifesaving Tool
Think of your firearm like your automobile. You wouldn't drive your car for years without changing the oil or checking the tires. Your handgun deserves the same level of care. Following these steps will not only keep your firearm in top working order but will also give you the confidence that comes from knowing your tool inside and out. You'll understand how it works, what it needs, and how to care for it.
Conclusion: Be Ready When It Counts
Consistent, simple maintenance is the key to preventing a failure during a critical moment. A firearm that is clean, lubricated, and regularly inspected is a firearm you can trust. By establishing a simple routine, you can ensure maximum reliability with minimal effort. Because when seconds count, your gun needs to work the first time, every time.
To make this process foolproof, the TactiBeaver Home Defense Kit was designed to provide everything covered in this guide and more. It offers multi-caliber cleaning capability for all your firearms, premium CLP products for superior cleaning and protection, and an organized, compact case to keep your tools at the ready. It even includes a quick-reference guide perfect for occasional shooters. This is a complete, professional-grade maintenance solution for under $75, built with quality components for longevity.
Give your firearms the care they deserve. Shop the TactiBeaver Home Defense Kit today for complete maintenance confidence.


